Showing posts with label Laravel 5 tutorials. Show all posts

Friday, 10 April 2015

Get and Post request in laravel

This post is about handling GET and POST request in Laravel.But before we start you should be familiar with Routing in Laravel.Because routing is the most fundamental part in laravel.Since this is a step by step series I suggest you to read amy previous post if you find anything confusing....So let's get started.
To understand GET and POST request in laravel we will be creating a simple form with Name and Password field.We will submit this form using both GET and POST method so that things become clear :)
Before we start building our form we must create a route to our form.Open routes.php and create the following route


1
2
3
Route::get('form',function(){
 return View::make('form');
});

We have created a simple route without any parameters to form.blade.php view which holds our form
Create form.blade.php and create a  simple form


 1
 2
 3
 4
 5
 6
 7
 8
 9
10
11
12
13
14
15
16
17
<!DOCTYPE html>
<html>
<head>
 <title></title>
</head>
<body>
<form method="get" action="verify_form">
 <label>Name</label>
 <input type="text" name="uname">
 <br>
 <label>Password</label>
 <input type="password" name="pass">
 <br>
 <input type="submit">
</form>
</body>
</html>

Simple HTML form with method as get and action set to verify_form.If you try to submit the form now you will get errors since we have not create a route to verify_form view.Open routes.php and create a route to verify_form.blade.php


1
2
3
Route::get('verify_form',function(){
 return View::make('verify_form');
});

Now since we have created a route to verify_form view we will just verify if our form is working by just printing the variable using $_POST[] method of php.
Open verify_form file and type in the following 2 lines


1
2
Name: {{$_GET['uname']}}<br>
Password: {{$_GET['pass']}}

Output
So our routes and all other methods are working properly...Remember GET is not the best method when you are dealing with sensitive data as you can see that uname and pass variable can be seen in the URL of the browser.
Coming to POST method the code almost remains the same except few changes like form method becomes post,Instead of get route we will create post route and we will grab the variable in verify_form using $_POST[] method
form.blade.php file


 1
 2
 3
 4
 5
 6
 7
 8
 9
10
11
12
13
14
15
16
17
<!DOCTYPE html>
<html>
<head>
 <title></title>
</head>
<body>
<form method="post" action="verify_form">
 <label>Name</label>
 <input type="text" name="uname">
 <br>
 <label>Password</label>
 <input type="password" name="pass">
 <br>
 <input type="submit">
</form>
</body>
</html>

routes.php file


1
2
3
Route::post('verify_form',function(){
 return View::make('verify_form');
});

verify_form file


1
2
Name: {{$_POST['uname']}}<br>
Password: {{$_POST['pass']}}

Remember the first route remains same in both the cases..and so the output.

Condition and loops in laravel

This post is about constructing loops and conditions in laravel using Blade template.So lets get started.
Open the routes.php file and create an array.What we will do here is create an array an add some conditions and loops to it so that use of each conditions becomes more clear.We will be passing the array from routes.php to views if you don't know how to do this I suggest you to read Routing in Laravel with Route Parameters . So lets get started
Open routes.php and type in the following code


1
2
3
4
Route::get('fruits',function(){
 $fruitlist = array('Apple','Mango','Banana');
 return View::make('fruits')->withFruits($fruitlist);
});

What we have done is just created an array of fruits and a route to fruit.blade.php using Laravel Magic method.Now we can access the fruits array in the fruit view.
fruits.blade.php file


 1
 2
 3
 4
 5
 6
 7
 8
 9
10
11
12
13
14
15
16
17
18
19
20
21
22
23
24
25
26
27
28
29
30
31
32
33
34
35
36
37
38
<!DOCTYPE html>
<html>
<head>
 <title>Fruits page</title>
</head>
<body>
 
{{ $fruits[0] }} <br/>
{{ $fruits[1] }} <br/>
{{ $fruits[2] }} <br/><br/><br/>
 
 Using condition statement 
 <br/>
 @if(count($fruits)>0)
 Fruits array is not empty <br/>
 @endif

@if(count($fruits)>3)
 Fruits array have more than 3 fruits <br/>
@elseif(count($fruits)<=3)
 Fruits array may have 3 fruits or less <br/>
@endif
<br/>
<br/>

Using for loop <br/>
@for($i = 0 ;$i < count($fruits);$i++ )
{{$fruits[$i]}} <br/> 
@endfor
<br/>
<br/>

Using foreach loop<br/>
@foreach($fruits as $fruit)
Fruit is {{$fruit}}<br/>
@endforeach
</body>
</html>


We have demonstrated a few of  basic conditions and loops in this example the rest can be coded in the same manner.All conditions and loops that are valid in PHP are valid in laravel,You can make use of any of those as per your requirement.
The output


Tuesday, 31 March 2015

Passing data to views in laravel

In this post I will show you how to pass data to views in laravel.This post is going to be a bridge between the route post and views.We will see how to pass data from routes.php file to views.
To get started lets open up the text editor and open routes.php and fruits.blade.php file( We created this file in the last post)
We will make some modifications in routes.php so that it is able to pass data to views/fruits.blade.php
There are two ways for passing data to views from routes
First one is like this


1
2
3
4
Route::get('fruits',function(){
 $fruitname = "Apple";
 return View::make('fruits')->with('var',$fruitname);
});


here we made use of with method to pass the variable.with() method takes 2 arguments,First one is the string and the second one is the variable.The string defines how you want your variable to be called in the view.In our example we have called it as var.Thus we can access the var value in views
Save the routes.php file.Open the fruits.blade.php and type in the following script
fruits.blade.php


1
2
3
4
5
6
7
8
9
<!DOCTYPE html>
<html>
<head>
 <title>Fruits page</title>
</head>
<body>
{{ $var }} 
</body>
</html>


Save the file and open you browser and browse to localhost/laravel/public/fruits you should get the following output.


Second way of passing the data

In this method we can pass the variable as an array without using the with() method.We can pass value as an array using key value pair.


1
2
3
4
Route::get('fruits',function(){
 $fruitname = "Apple";
 return View::make('fruits', array('var' => $fruitname));
});


The fruits.blade.php page remains the same and the out put too.

We can also pass multiple values using array method by adding key value pairs like


1
2
3
4
Route::get('fruits',function(){
 $fruitname = "Apple";
 return View::make('fruits', array('var' => $fruitname,'var2'=>$somevariable,'var3'=>$someothervariable);
});


And access the value of variable in the view using key.
with() method can also be used to send multiple values


1
2
3
4
Route::get('fruits',function(){
 $fruitname = "Apple";
 return View::make('fruits')->with('var',$fruitname)->with('var1',$somevariable)->with('var2',$someothervariable)
});


Accessed in the same way in views.
Next post will be about sending data using magic methods.

Saturday, 28 March 2015

Basics of blade and views in laravel (Part-1)

In the last post we learned how to create routes in laravel with route parameters but in that tutorial we did not create any view we only returned plain text.In this post I will show you how to create a view for a particular route using blade template engine.Since Laravel is a framework based on MVC architecture we have to follow certain standard format while developing our Laravel Applications
Before we jump on to code lets understand what is a view?
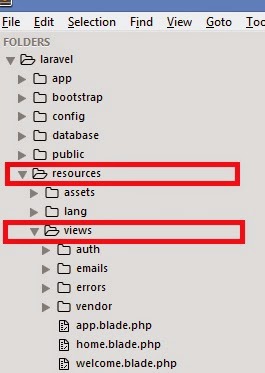
Views typically contain the HTML of your application and provide a convenient way of separating your controller and domain logic from your presentation logic. Views are stored in the resources/views folder


Now lets jump into the code
Open routes.php located in app/Http folder and create a new route.Read more about creating routes.


1
2
3
Route::get('fruits',function(){
 return View::make('fruits');
});


Save the file.Create a new file named fruits.blade.php in the views folder and dump in some basic php stuff and save the file.I just did this


 1
 2
 3
 4
 5
 6
 7
 8
 9
10
<!DOCTYPE html>
<html>
<head>
 <title>Fruits page</title>
</head>
<body>
 <?php $var = "Fruits view"; ?>
{{ $var }} 
</body>
</html>

Open the browser and navigate to localhost/laravel/public/fruits(According to my file structure yours might vary).You should get the following output.


What we just did is created a route to fruit view.The function in the route called the static make method of the view class and the argument that it takes is a view.Make sure that a view exists before you create a route otherwise you will be presented with a page full of errors.We named the view as fruit.blade.php we used the blade extension to tell the framework that we are using blade templating engine.You might have noticed that {{ $var }} did the job of echo $var.This is where blade template becomes handy,it makes code clean and tidy and removes the need of those untidy <? echo ?> when you want to print something.Blade template is not limited to only printing on page but it has many uses which we will see in the later posts.