Friday 10 April 2015

Database connection in laravel

This post is about creating a database connection in laravel.Connecting to database is quite simple and you need not take any pain in the process.So lets start.Before we create a connection to database we need a create so lets first create a database.If you know this step you can skip this process.I will be using CMD to create a database example with table users having fields id auto increment,name varchar,country varchar.
I'm attaching a screen shot of my CMD.Please preview it by clicking on it since it is appearing small.


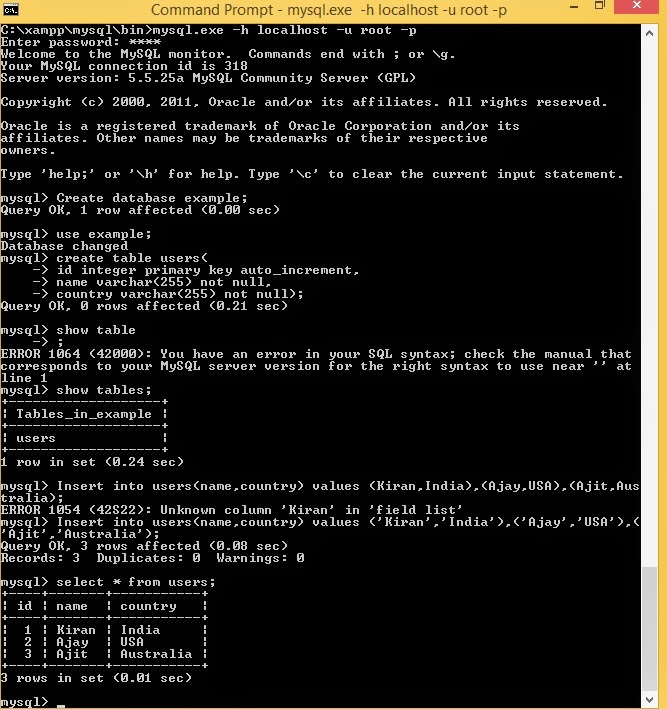
Ignore the errors which i got while executing the queries :p
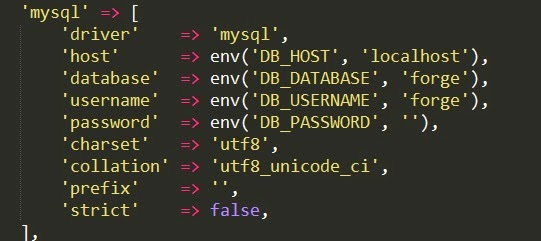
Now lets create a connection to this database go to app/config and open database.php.Search for this block of code


Change the DB_DATABASE to example,DB_USERNAME to root,DB_PASSWORD to root.(Yours credentials may defer )


Thats all folks and we are done with database connectivity :)

Get and Post request in laravel

This post is about handling GET and POST request in Laravel.But before we start you should be familiar with Routing in Laravel.Because routing is the most fundamental part in laravel.Since this is a step by step series I suggest you to read amy previous post if you find anything confusing....So let's get started.
To understand GET and POST request in laravel we will be creating a simple form with Name and Password field.We will submit this form using both GET and POST method so that things become clear :)
Before we start building our form we must create a route to our form.Open routes.php and create the following route


1
2
3
Route::get('form',function(){
 return View::make('form');
});

We have created a simple route without any parameters to form.blade.php view which holds our form
Create form.blade.php and create a  simple form


 1
 2
 3
 4
 5
 6
 7
 8
 9
10
11
12
13
14
15
16
17
<!DOCTYPE html>
<html>
<head>
 <title></title>
</head>
<body>
<form method="get" action="verify_form">
 <label>Name</label>
 <input type="text" name="uname">
 <br>
 <label>Password</label>
 <input type="password" name="pass">
 <br>
 <input type="submit">
</form>
</body>
</html>

Simple HTML form with method as get and action set to verify_form.If you try to submit the form now you will get errors since we have not create a route to verify_form view.Open routes.php and create a route to verify_form.blade.php


1
2
3
Route::get('verify_form',function(){
 return View::make('verify_form');
});

Now since we have created a route to verify_form view we will just verify if our form is working by just printing the variable using $_POST[] method of php.
Open verify_form file and type in the following 2 lines


1
2
Name: {{$_GET['uname']}}<br>
Password: {{$_GET['pass']}}

Output
So our routes and all other methods are working properly...Remember GET is not the best method when you are dealing with sensitive data as you can see that uname and pass variable can be seen in the URL of the browser.
Coming to POST method the code almost remains the same except few changes like form method becomes post,Instead of get route we will create post route and we will grab the variable in verify_form using $_POST[] method
form.blade.php file


 1
 2
 3
 4
 5
 6
 7
 8
 9
10
11
12
13
14
15
16
17
<!DOCTYPE html>
<html>
<head>
 <title></title>
</head>
<body>
<form method="post" action="verify_form">
 <label>Name</label>
 <input type="text" name="uname">
 <br>
 <label>Password</label>
 <input type="password" name="pass">
 <br>
 <input type="submit">
</form>
</body>
</html>

routes.php file


1
2
3
Route::post('verify_form',function(){
 return View::make('verify_form');
});

verify_form file


1
2
Name: {{$_POST['uname']}}<br>
Password: {{$_POST['pass']}}

Remember the first route remains same in both the cases..and so the output.

Condition and loops in laravel

This post is about constructing loops and conditions in laravel using Blade template.So lets get started.
Open the routes.php file and create an array.What we will do here is create an array an add some conditions and loops to it so that use of each conditions becomes more clear.We will be passing the array from routes.php to views if you don't know how to do this I suggest you to read Routing in Laravel with Route Parameters . So lets get started
Open routes.php and type in the following code


1
2
3
4
Route::get('fruits',function(){
 $fruitlist = array('Apple','Mango','Banana');
 return View::make('fruits')->withFruits($fruitlist);
});

What we have done is just created an array of fruits and a route to fruit.blade.php using Laravel Magic method.Now we can access the fruits array in the fruit view.
fruits.blade.php file


 1
 2
 3
 4
 5
 6
 7
 8
 9
10
11
12
13
14
15
16
17
18
19
20
21
22
23
24
25
26
27
28
29
30
31
32
33
34
35
36
37
38
<!DOCTYPE html>
<html>
<head>
 <title>Fruits page</title>
</head>
<body>
 
{{ $fruits[0] }} <br/>
{{ $fruits[1] }} <br/>
{{ $fruits[2] }} <br/><br/><br/>
 
 Using condition statement 
 <br/>
 @if(count($fruits)>0)
 Fruits array is not empty <br/>
 @endif

@if(count($fruits)>3)
 Fruits array have more than 3 fruits <br/>
@elseif(count($fruits)<=3)
 Fruits array may have 3 fruits or less <br/>
@endif
<br/>
<br/>

Using for loop <br/>
@for($i = 0 ;$i < count($fruits);$i++ )
{{$fruits[$i]}} <br/> 
@endfor
<br/>
<br/>

Using foreach loop<br/>
@foreach($fruits as $fruit)
Fruit is {{$fruit}}<br/>
@endforeach
</body>
</html>


We have demonstrated a few of  basic conditions and loops in this example the rest can be coded in the same manner.All conditions and loops that are valid in PHP are valid in laravel,You can make use of any of those as per your requirement.
The output